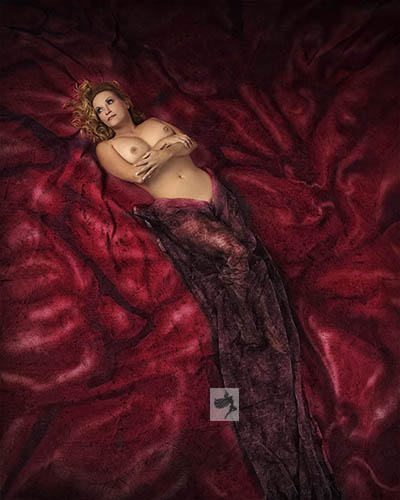
Sometimes you can take your reject images and turn them into something very cool and saleable. This image is from a commissioned session. We were setting up for the popular Bed of Roses theme session, where we cover the floor with rose petals once we get our client posed.
The before shot was a test image for lighting, which looks great. The background is pretty abused with lots of staining from the rose petals. It turns out when you step on them they bleed into the fabric. We don’t worry about it since usually the petals cover that up.

To achieve the after image, I went through a series of steps. There are two ways to approach images for digital manipulation or enhancements.
You can start out with a plan before you even pick up your camera. This way works best with notes and sketches that you work to. When you get back to the computer room, you have a good idea what your final image will be. You have taken all the element shots, and know the effects you will be applying when you commence building the image.
The other way is more by the seat of your pants. You find an image with promise – something that can go further – and pull that to work on. It’s still important to have an idea of where you want to take your creation. That will guide you in the tools and effects that you try. It keeps you focused so you don’t spend too much time going down dead alleyways.
With this image I saw it as a darker, dramatic image that remained very color rich.
So the first step was to increase the texture or relief of the image. My go-to tool for this is the NIK tonal contrast filter. You can see the change in the image below. Rather than diminish our problem stains, I want to really bring them out, giving the image an edge. I reduced the effect on her skin, though, by using a mask to reveal the original layer.

The next step is the big leap. Using OnOne effects, I applied a collection of filters, vignette, tonal controls to push the pink tones further apart to get that strong difference in the leg fabric from the backdrop tones. See the below revision. I then brought back the original layer to bring the skin tones back to a softer effect and lighten the leg fabric.

Now in the fourth image (below), I introduced Nik’s Midnight filter. It brings everything down into the dark and moody, still too much for the skin, so that was masked back to the previous layer.
In the final step, I went into the saturation tool, targeted the pink red hues to increase them. This gives them that glowing effect you see in the final image.
Now the steps are not as important as watching the progression. You need to slowly build on your vision. Often a step may need to be done out of the flow with the worked on image brought in as a layer. By working with layers, you can see your thinking process, but are also able to go back a few steps if you find yourself going down an ineffective path.
It’s working to a sense or a vision with this approach that will make it successful. What will help you is doing a lot of these as doodles, if you will, to get it into your subconscious what steps and what filters will accomplish what effects. How do they combine with other steps or effects?